 Presented from Issue 114, February 2015
Crafting something with your own hands can be incredibly fulfilling. I have a trade background as a fitter, machinist and toolmaker and have made many things from metal, timber and other things over many years.
Some time ago I thought I would build a small drift boat and searched the internet for some plans. There are hundreds of plans online from free to a few hundred dollars. Like most things in life it is wise to spend enough to get what you need.
Drift boats are most common in the USA and used there mostly for floating downstream on rivers. The design is characterized by a wide, flat bottom, flared sides, a narrow, flat bow, and a pointed stern. A rocker is designed into the bottom along an arc from bow to stern of the boat. They are sort of back to front and can be rowed either way depending on the situation and speed of water. Drift boats have a very shallow draft and are very easily manoeuvred, spun around and held in fast water.
Drift boats have become more popular in recent times in Tasmania and we have many waters for which this style of boat is ideal. At least a three guides now use them and a few locals have either built or imported different styles.
Many pictures are at the end of the article.
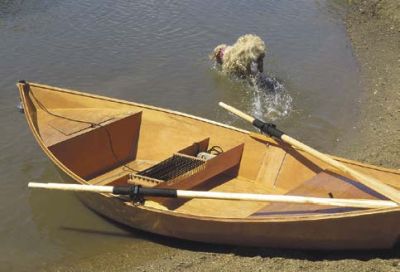
 |
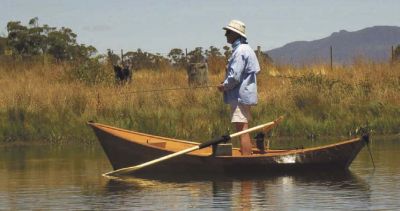
| Suits a man and his dog. |
The idea I had been following for some time was to build a small drift boat using plywood and the ‘stitch and glue’ method. Stitch and glue is a very simple method that uses the plywood and formed bulkheads for strength and shape. There are generally no frames and very few, if any screws – everything is held together with epoxy and fibreglass.
So after many hours of looking I found a boat designed by Paul Butler called a Mini Mac. This is a smaller version of an American Mackenzie River drift boat. Anyone that has looked at or understands American drift boats will know there are many styles – often specifically designed for an individual river – or even part of a river. Some are designed for heavy white water and only to be rowed.
They have quite pronounced bows and a lot of rocker. Rocker is the curve forward and aft in what are generally flat bottom boats. Some boats are able to be fitted with a small outboard so they can be motored upstream.
Boats range in size from around 12’ to 16’ and the internal capacity varies enormously – as does the beam and weight.
The Mini Mac caught my attention for a number of reasons. It was small, light, attractive, stitch and glue, fast and easy to build and inexpensive.
I clicked on the ‘add to shopping basket’ icon and paid my $80 or so via Paypal for some full size paper plans. A week or so later they arrived with construction instructions, but being a tad busy they sat on a shelf for a few weeks.
My wife was stuck down with a severe migraine one weekend and that meant I stayed at home in case I could help with anything. Anyone who has ever suffered from this debilitating affliction will understand how horrible it can be.
This put me in a situation of not going far and being on call if needed. So out came the plans and the booklet for a bit of a study. As with all instructions you should read them several times and fully understand the process before even thinking about starting. You may also take some time to have a look at some forums that will details the trials and tribulations of people who have built the same boat you are about to start.
I did all that and was now prepared for the construction stage. A bit of googling and off I went to Bunnings to collect some sheets of AA grade marine ply. The plans called for 4mm and 6mm, but I decided that as Bunnings didn’t have 4mm I would try and do the whole job with 6mm. Instead of three sheets of 4mm and two sheets of 6mm I did the whole job with four sheets of 6mm.
I am told the Bunnings marine ply is relatively heavy and lightweight marine ply can be sourced. Not bothered by that, I checked on my wife and set about transferring the plans from paper to ply. Simply tape the plans to the ply and then with a small punch or nail mark through the paper onto the wood every 50mm or so. These marks are then joined together, or lofted, using a flexible strip of timber to get the correct curve. It can help to have a mate here, but it is possible on your own.
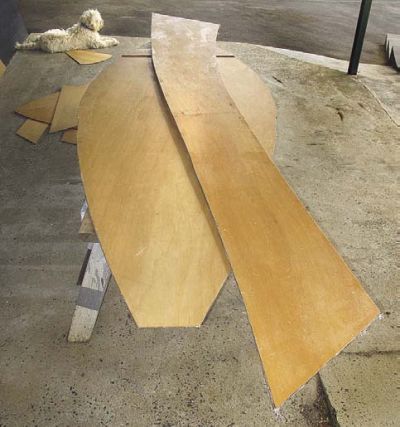
The setting out probably only took two hours and then it was out with the jigsaw. The sides are identical so by clamping two sheets together the four pieces that form the two sides are cut at the same time and they will be identical.
There is also a transom, two pieces for the bottom/ floor, three bulkheads, two decks and other pieces such as butt blocks.
The centre seat can be made a number of ways and as there is plenty of ply left, I used this for the seat. So after day one I had the boat panels, less the seat, fully cut out and sanded to remove the rough edges.
Then I sat down and read the booklet again.
Whilst I wanted to keep this little drift boat as a car topper and light I did have plans to fibreglass it inside and out so I asked David Mercer from Penguin Composites the best way to go about it. He suggested fibreglassing both sides of the ply before assembly started, so that is what HE did and sent it back to me with all sheets fibreglassed both sides. I had also butt jointed the two pieces that make up each side as well as the two pieces for the bottom.
 |
| The Mini Mac is perfect for Brumbys Creek. |
Next step is where the ‘stitch and glue’ technique comes in and everything starts to come together and it starts to look like a boat. Along all the edges where the sides meet the bottom, transom and bow holes are drilled every 50 to 75mm, or as necessary, to tie everything together. They must correspond, because through these holes are placed zip ties or copper wire; these are the ‘stitches’. The transom and sides are now ‘zip tied’ loosely together. It is very floppy arrangement now and probably time to call in a mate. The bottom is then fixed with temporary screws through the to a base (bench or solid plank) and blocked up 25mm each end to give it the correct ‘rocker’.
Then the sides and transom are man handled and pulled to fit over the floor and base. Sounds simple and you can do it on your own, but a mate is a lot of help. Then it is a matter of ‘zipping’ the floor and sides together. You now have a structure that looks like a boat. A temporary spreader is placed to keep the sides in the correct position and do whatever is necessary with clamps or straps to get things square and lined up. This is critical as the next step starts to firm things up and if not right here is is hard to change later on.
Now comes the glueing part of the ‘stitch and glue’ process. Epoxy is mixed and used to glue between the stitches on the sides, transom and bow. Let it set, removed the zip ties and then fill in the gaps, both inside and out with epoxy glue. Sounds simple, and it can be, but don’t hurry it and don’t over do the glue as it is hard to clean up afterwards. If you can get away without sanding and grinding so much the better.
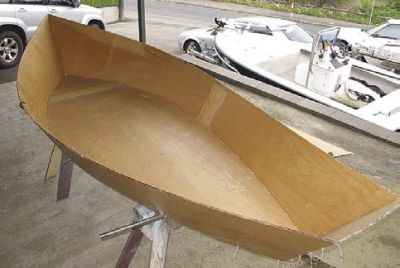
Adding the bulkheads and fillets are next. The bulkheads really start to stiffen the structure up and you can fit these, keeping in mind you need to be able to form internal epoxy fillets as well. Ensure the process allows you to get to these internal joints.
Getting good epoxy fillets is the most difficult part of the process and it is very important. These are structural as well as cosmetic and plenty of time should be taken to get them right. The structural aspect is that the load is spread over a broader area than just the butt joint. It is usual to add some sort of filler to get the epoxy used to a thickness often described as consistency of peanut butter.
When applying the epoxy fillets many people mask to about 15mm of the corner and work to this edge. Once epoxy sets it is very hard to move so err on the neat side. Preparation is everything. Adding the decks and seat is a continuation of what I have described and if you take it slowly and well considered you will end up with a great looking boat.
Getting good epoxy fillets is the most difficult part of the process and it is very important. These are structural as well as cosmetic and plenty of time should be taken to get them right. The structural aspect is that the load is spread over a broader area than just the butt joint. It is usual to add some sort of filler to get the epoxy used to a thickness often described as consistency of peanut butter.
When applying the epoxy fillets many people mask to about 15mm of the corner and work to this edge. Once epoxy sets it is very hard to move so err on the neat side. Preparation is everything.
Adding the decks and seat is a continuation of what I have described and if you take it slowly and well considered you will end up with a great looking boat.
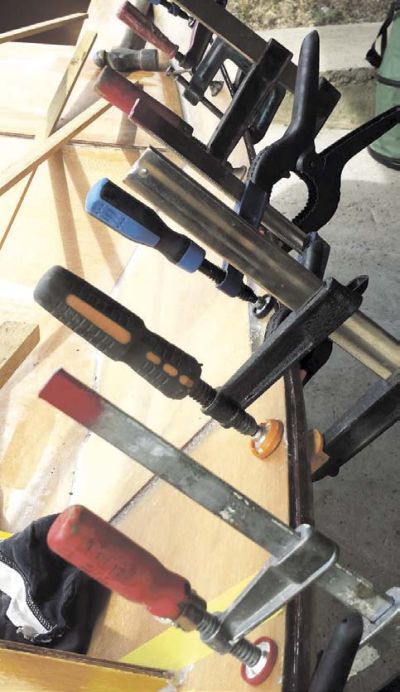
The gunwales are strengthend by using a several thin timber strips either side of the side panels. You can get fancy here and use contrasting timber colours. I used readily available 30mm x 6mm hardwood and a strip of western red cedar. These are glued on with epoxy and you will need many clamps. So ring around your mates and borrow all you can. Once the gunwale strips are glued and set you will need to run epoxy fillets under these – once again to add structural strength.
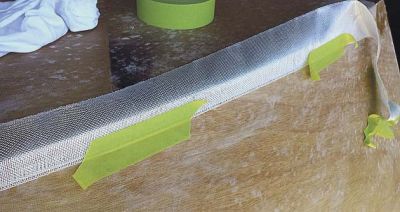
The outside edges of the bow, transom, and chines are now covered with fibreglass tape. I used two layers, but this depends on use how many layers you want to use – not usually for strength, but for longevity bumping over rocks etc.
I had a couple of goes to get the rowlocks in the correct front-rear rowing position as well as the height. This will vary depending on your size. Once I got that correct I made new oarlocks and permanently attached them.
You can individualise your boat in many ways to suit your fishing style with compartments, seats etc and with the stitch and glue method it is easy.
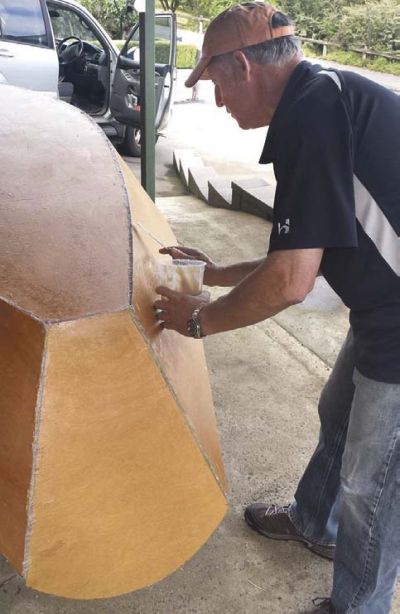
Some may want to finish the boat with epoxy, varnish or marine paint. Be warned here though the finishing will take as long as the main build, but you can end up with a thing of beauty.
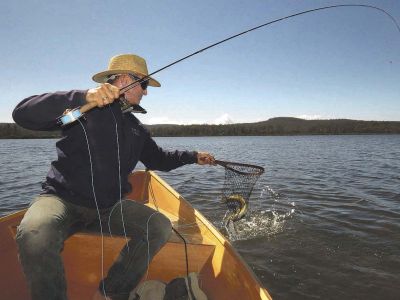
The first trip ironed out a few issues, such as getting the oar length and position correct. The next trip was a huge success with a 14 fish day. The Mini Mac is easy to row and it can be car topped easily. It has plenty of storage and with a fully sealed compartment it is unsinkable.
This project so excited me I have asked my son to design a slightly bigger plywood drift boat, but still keeping it light weight. Hamish is a naval architect and not long after I gave him some dimensions he had a new drift boat designed for Tasmanian waters. It will be around four metres overall and still be able to be a car topper.
You will be able to buy the plans and construction book, precut basic kit, or assembled to various levels.
Full details and costs will be in the next issue or if you are interested in plans or a kit contact This email address is being protected from spambots. You need JavaScript enabled to view it. Just recently a successful business man and friend said he had never built anything with his own hands and at 70 he thought it was time he did. He loves boats and fishing and is confident he can build a beautiful drift boat.
Mike Stevens
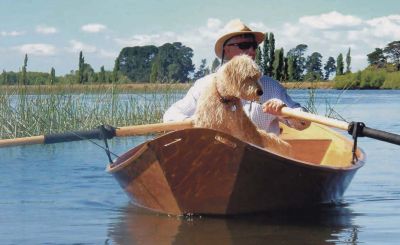
Suits a man and his dog.
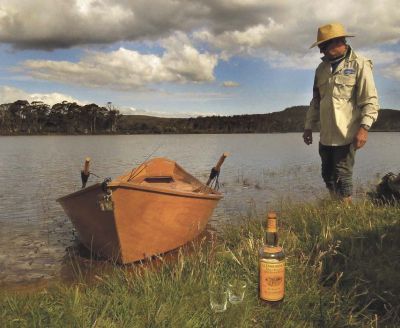
The Mini Mac is perfect for Brumbys Creek.
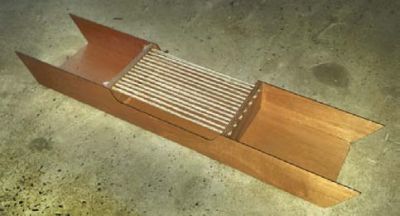
Cut out and all panels fibreglassed.
Sides and transom stitched together; above and below.
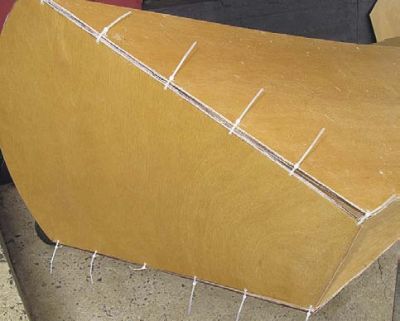
Sides, bottom and transom stitched into shape.
Stitches removed and all external joints are filled with thickened
epoxy. Rounded fillets are then run on the inside of all joins.
When gluing up the gunwale strips you can’t have too many clamps.
External joins are strengthened with two layers of fibreglass tape
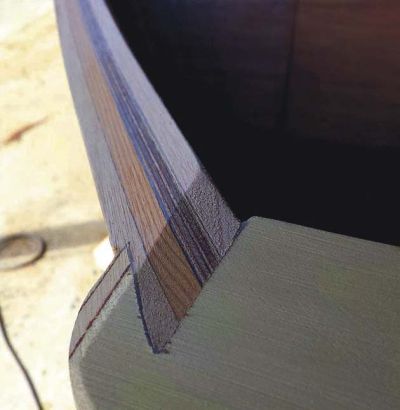
Gunwale looks great with hardwood, cedar, plywood and
another hardwood strip looks attractive.
Structure almost complete.
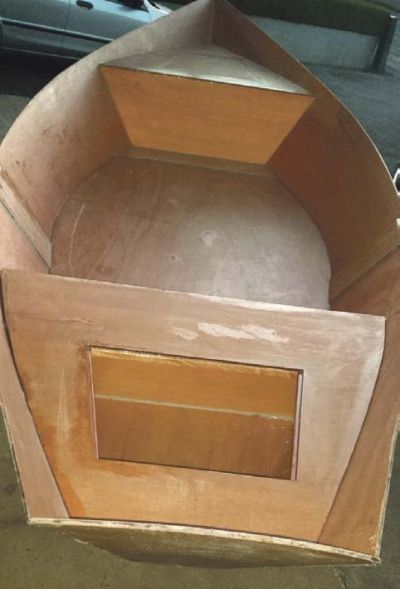
The seat, ready to fit.
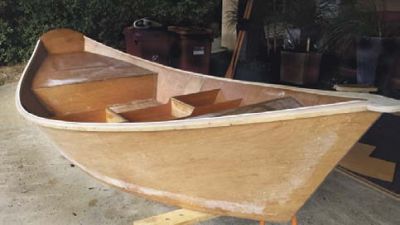
Launch day went well. Some adjustment was needed to
oar/rowlock height, but it rows and manoeuvres beautifully.
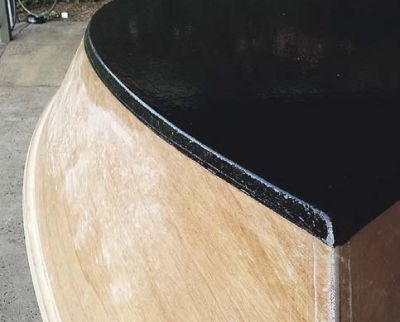
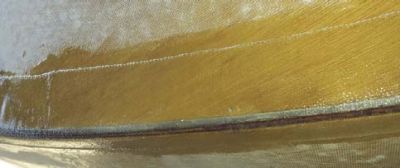
The bottom is finished with graphite mixed into the epoxy.
As it scratches and wears it becomes more slippery.